GitHub Webhook Receiver
The GitHub webhook receiver responds to ping, push, package, and
registry_package events originating from GitHub.
The receiver unconditionally responds to ping events with an HTTP 200 status
code.
The receiver responds to push events by refreshing all Warehouse resources
subscribed to the Git repositories from which those events originated.
The receiver responds to package events by refreshing all Warehouse
resources subscribed to the GHCR repositories from which those events
originated.
"Refreshing" a Warehouse resource means enqueuing it for immediate
reconciliation by the Kargo controller, which will execute the discovery of new
artifacts from all repositories to which that Warehouse subscribes.
The GitHub webhook receiver also works with GitHub Enterprise Cloud and GitHub Enterprise Server, although some URLs in this document may need to be adjusted accordingly.
Configuring the Receiver
A GitHub webhook receiver must reference a Kubernetes Secret resource with a
secret key in its data map. This
shared secret will be used by
GitHub to sign requests and by the receiver to verify those signatures.
The following commands are suggested for generating and base64-encoding a complex secret:
secret=$(openssl rand -base64 48 | tr -d '=+/' | head -c 32)
echo "Secret: $secret"
echo "Encoded secret: $(echo -n $secret | base64)"
apiVersion: v1
kind: Secret
metadata:
  name: gh-wh-secret
  namespace: kargo-demo
  labels:
    kargo.akuity.io/cred-type: generic
data:
  secret: <base64-encoded secret>
---
apiVersion: kargo.akuity.io/v1alpha1
kind: ProjectConfig
metadata:
  name: kargo-demo
  namespace: kargo-demo
spec:
  webhookReceivers:
    - name: gh-wh-receiver
      github:
        secretRef:
          name: gh-wh-secret
Retrieving the Receiver's URL
Kargo will generate a hard-to-guess URL from the receiver's configuration. This URL can be obtained using a command such as the following:
kubectl get projectconfigs kargo-demo \
  -n kargo-demo \
  -o=jsonpath='{.status.webhookReceivers}'
Registering with GitHub
There are three options whereby GitHub repositories can be configured to send events to the webhook receiver:
-
Configure webhooks directly for a single repository.
The advantage of this approach is that it is comparatively simple, however, its large disadvantage is that it is tedious and most likely infeasible to repeat this configuration for a large number of repositories.
-
Configure webhooks directly at the organization level.
The advantage of this approach is that it is simple and applies to all repositories in the organization, however, its disadvantage is that it requires organization-level permissions and will send events from all repositories in the organization.
-
Create a GitHub App.
The disadvantage of this approach is that it is comparatively complex, however, its large advantage is that once created and configured, the App can be easily installed into any number of GitHub repositories (belonging to the same account that owns the App).
In the sections below, you will find instructions for all three options.
Webhooks from a Single Repository
To configure a single GitHub repository to notify a receiver of relevant events:
-
Navigate to
https://github.com/<account>/<repository>/settings/hooks, where<account>has been replaced with a GitHub username or organization name and<repository>has been replaced with the name of a repository belonging to that account and for which you are an administrator.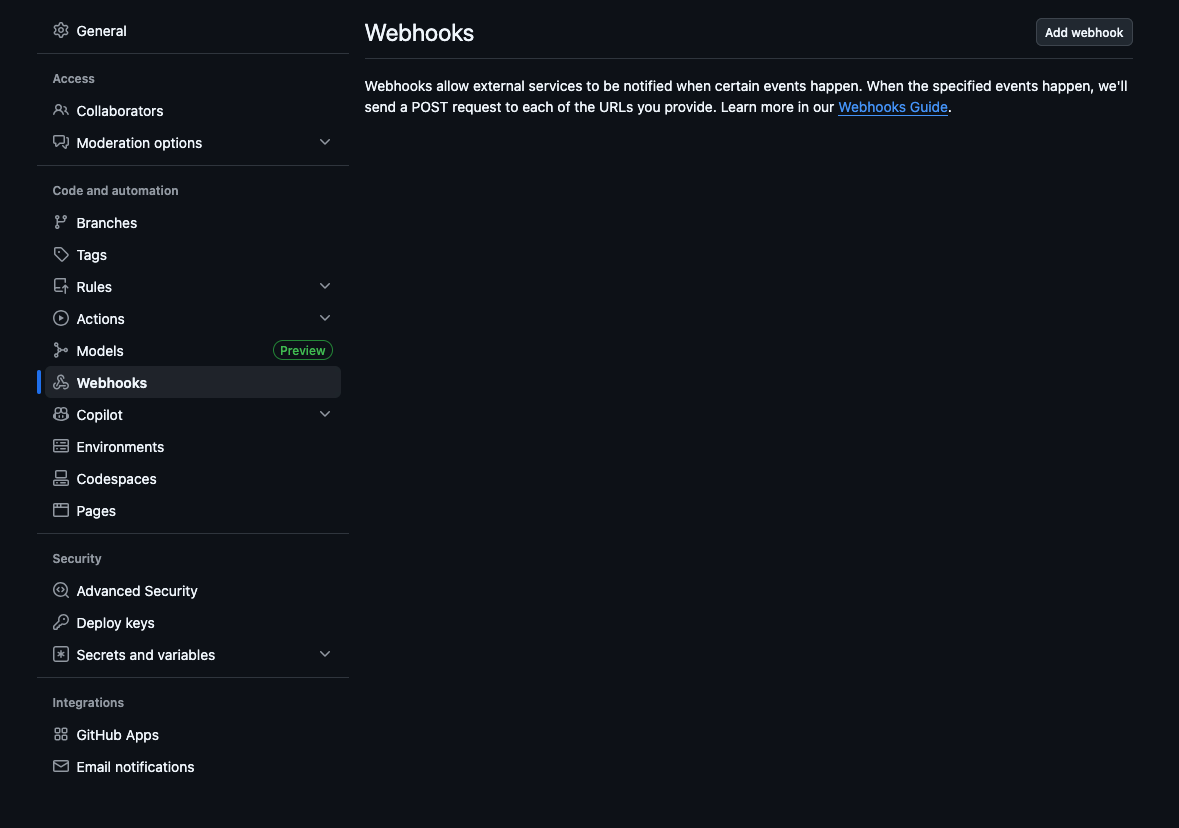
-
Click Add webhook.
-
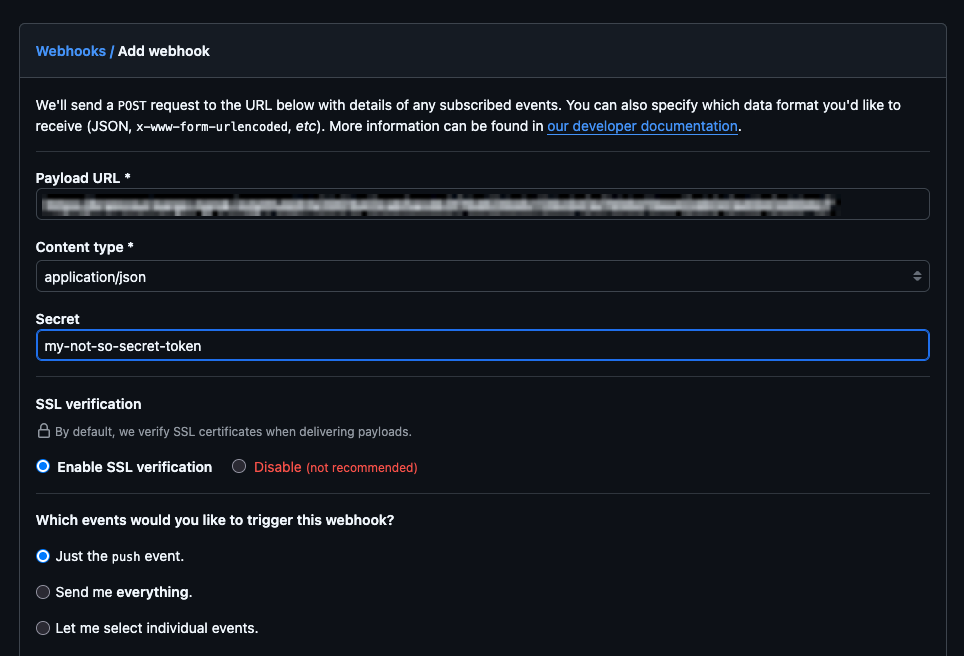
Complete the Add webhook form:
-
Complete the Payload URL field using the URL for the webhook receiver.
-
Set Content type to
application/json. -
Complete the Secret field using to the (unencoded) value assigned to the
secretkey of theSecretresource referenced by the webhook receiver's configuration. -
Under Which events would you like to trigger this webhook?:
Leave Just the push event. selected, unless you would like to receive events when container images or Helm charts are pushed to associated GHCR repositories.
To receive such events, select Let me select individual events., then ensure Pushes and Packages are both selected.
noteYou will only receive events from those GHCR repositories explicitly associated with your Git repository.
For more information on this topic, refer to these GitHub docs.
-
Ensure Active is selected.
-
Click Add webhook.
-
-
Verify connectivity:
-
From the Webhooks dashboard, select the new webhook.

-
Select the Recent Deliveries tab.

-
Select the ping event and ensure an HTTP response status of
200was received from the webhook receiver.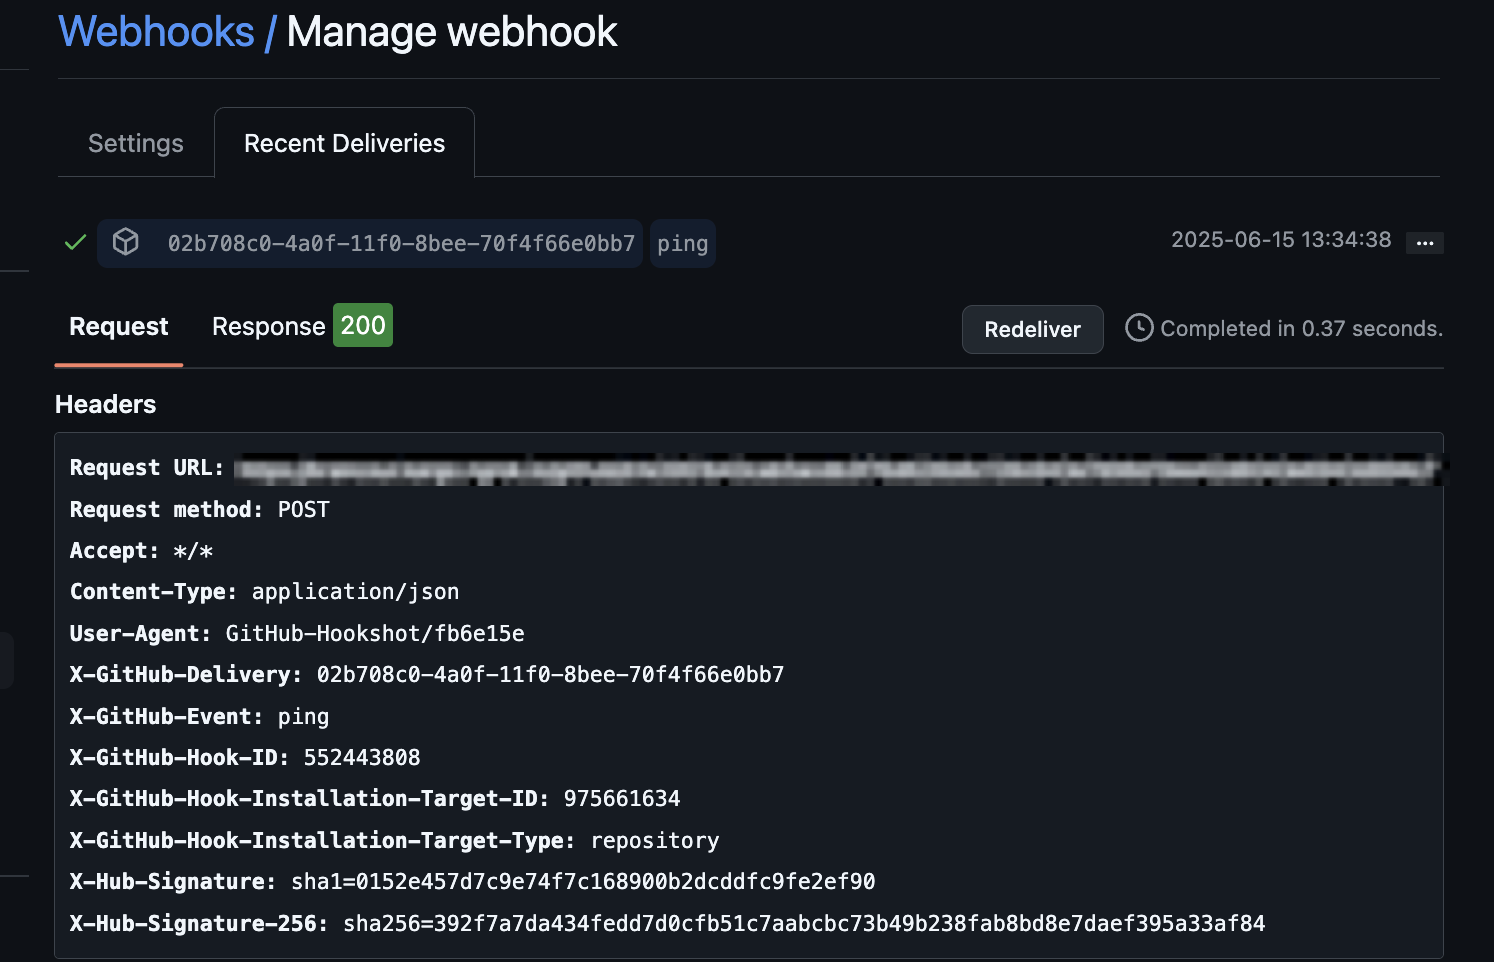
-
When these steps are complete, the repository will send events to the webhook receiver.
For additional information on configuring webhooks, refer directly to the GitHub Docs.
Webhooks from an Organization
To configure an organization to notify the receiver of relevant events from all repositories in the organization:
-
Navigate to
https://github.com/organizations/<organization>/settings/hooks, where<organization>has been replaced with the name of an organization for which you are an administrator.
-
Click Add webhook.
-
Complete the Add webhook form:

-
Complete the Payload URL field using the URL for the webhook receiver.
-
Set Content type to
application/json. -
Complete the Secret field using to the (unencoded) value assigned to the
secretkey of theSecretresource referenced by the webhook receiver's configuration. -
Under Which events would you like to trigger this webhook?:
Leave Just the push event. selected, unless you would like to receive events when container images or Helm charts are pushed to associated GHCR repositories.
To receive such events, select Let me select individual events., then ensure Pushes and Packages are both selected.
noteYou will only receive events from those GHCR repositories explicitly associated with your Git repository.
For more information on this topic, refer to these GitHub docs.
-
Ensure Active is selected.
-
Click Add webhook.
-
-
Verify connectivity:
-
From the organization Webhooks dashboard, select the new webhook.

-
Scroll down to the Recent Deliveries section.

-
Select the ping event and ensure an HTTP response status of
200was received from the webhook receiver.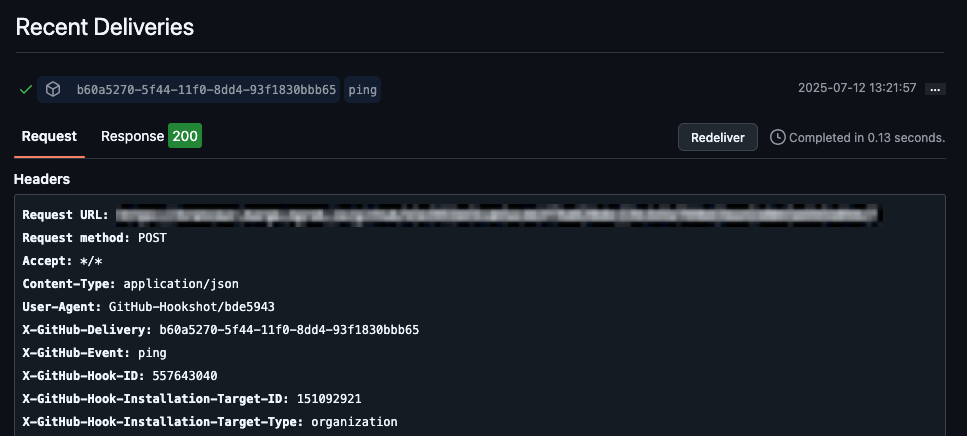
-
When these steps are complete, all repositories in the organization will send events to the webhook receiver.
For additional information on configuring organization webhooks, refer directly to the GitHub Docs.
Webhooks from a GitHub App
To configure a GitHub App to notify the receiver of relevant events from any repository into which it's been installed:
-
Navigate to https://github.com/settings/apps to create a new GitHub App owned by your own account
OR
Navigate to
https://github.com/organizations/<organization>/settings/apps, where<organization>has been replaced with an organization for which you are an administrator to create a new GitHub App owned by that organization. -
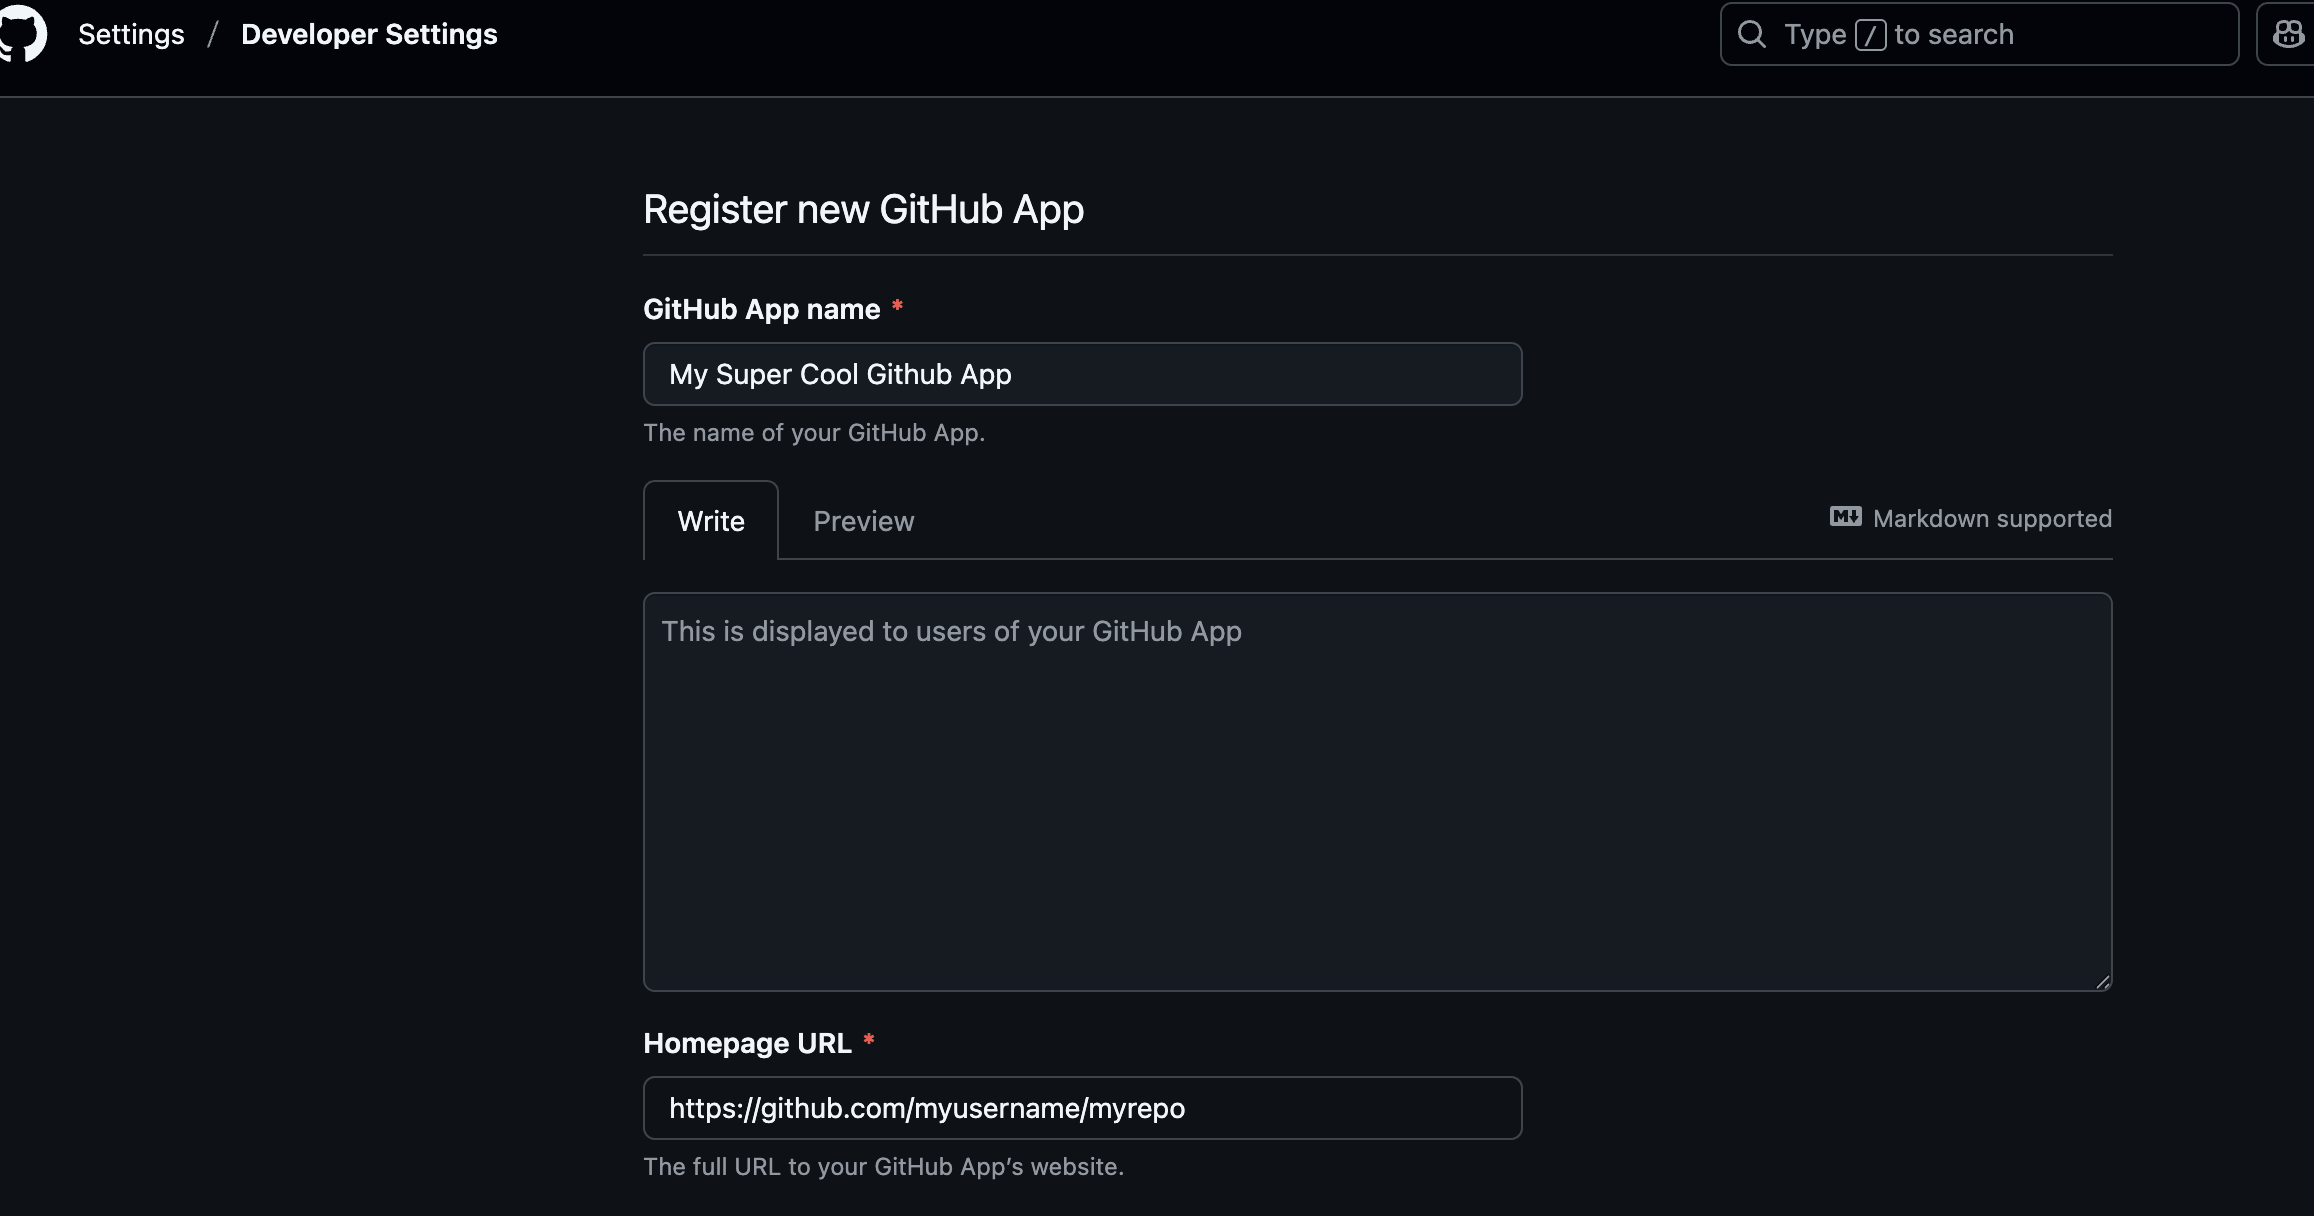
Complete the Register new GitHub App form:
-
Complete the GitHub App name field using a name of your choosing.
noteThis name must be globally unique across all of GitHub.
Unfortunately, you will not learn whether the name you've selected is available or not until you have submitted the form.
-
Complete the Homepage URL field using a URL of your choosing.
infoThis is a required field, but for our purposes, its value is unimportant.
-
Skip the Identifying and authorizing users and Post installation sections of the form.
infoThese sections are not relevant to webhook delivery.
-
Complete the Webhook URL field using the URL for the webhook receiver.
-
Complete the Secret field using the (unencoded) value assigned to the
secretkey of theSecretresource referenced by the webhook receiver's configuration. -
In the Permissions section of the form, expand Repository Permissions.
-
Ensure Contents is set to Read-only.
-
If you would like to receive events when container images or Helm charts are pushed to associated GHCR repositories, set Packages to Read-only.
noteYou will only receive events from those GHCR repositories explicitly associated with your Git repository.
For more information on this topic, refer to these GitHub docs.
-
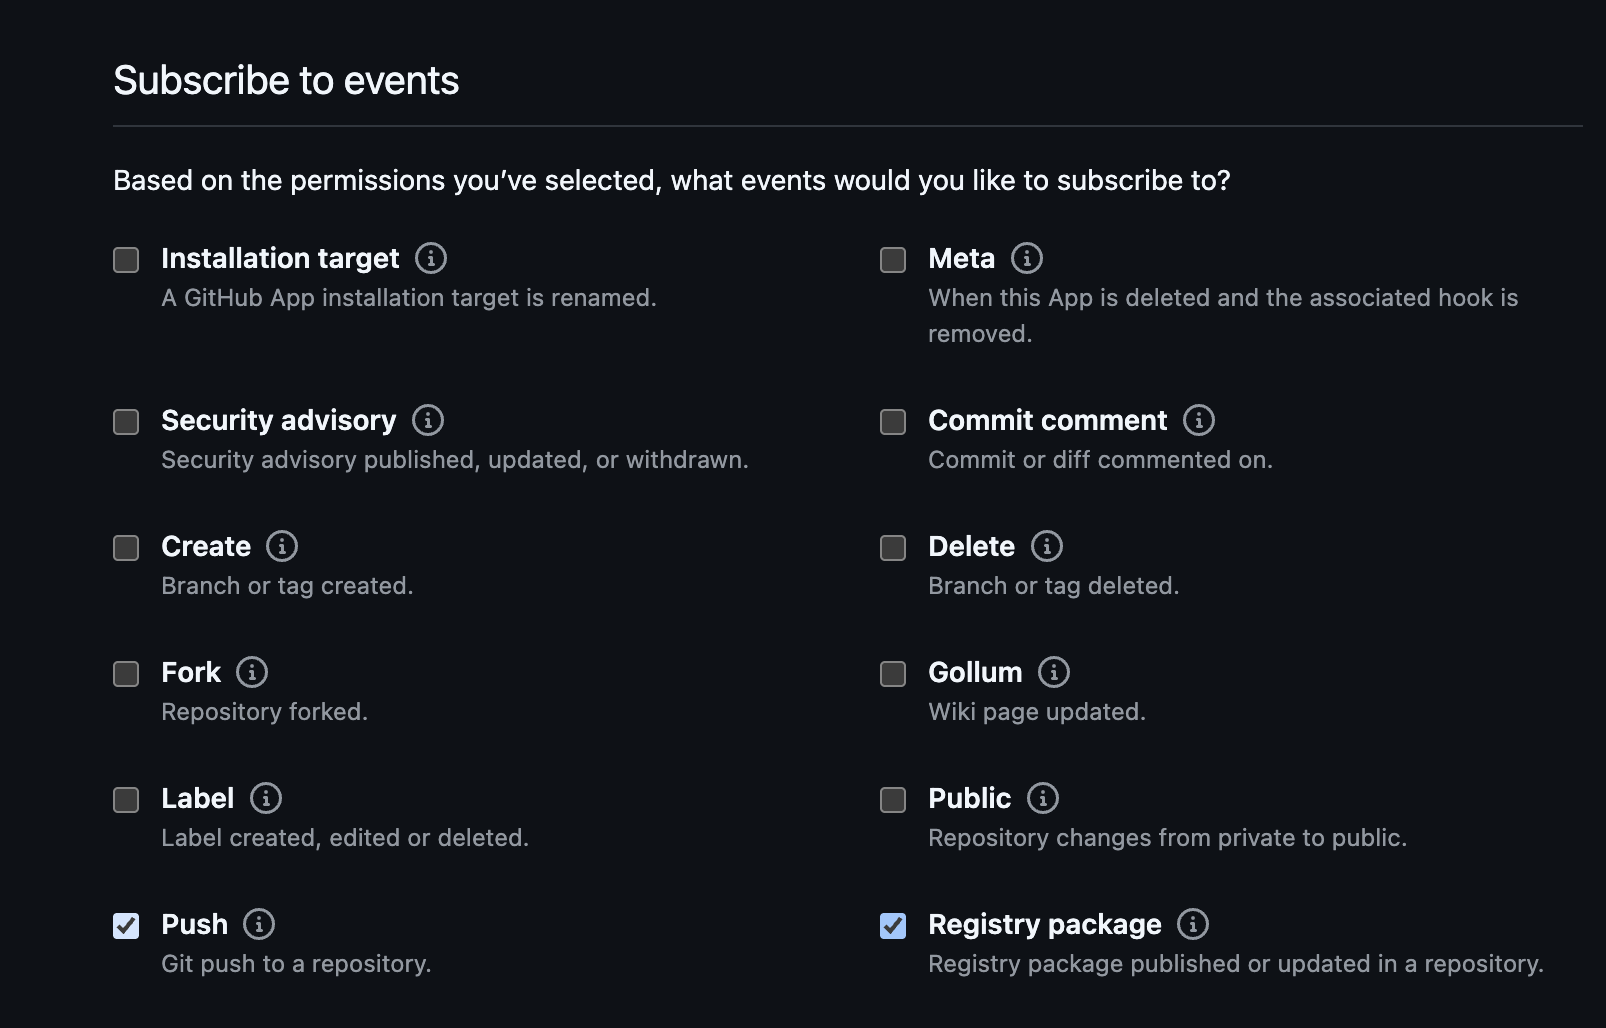
In the Subscribe to events section of the form, ensure Push is selected.
If you would like to receive events when container images or Helm charts are pushed to associated GHCR repositories, ensure Registry package is also selected.
noteThe events available for selection in this section of the form are dynamic and dependent on your selections in the Permissions section.
-
Under Where can this GitHub App be installed? ensure Only this account is selected.
dangerIf you select the other option (Any account), your App will be installable into any repository in GitHub, regardless of what account owns it. Every repository into which your App is installed will send events to the webhook receiver. You almost certainly do not want this!
-
Click Create GitHub App.
-
-
Verify connectivity:
-
From the new App's settings page, select Advanced from the left sidebar.
-
Under Recent Deliveries, select the ping event and ensure an HTTP response status of
200was received from the webhook receiver.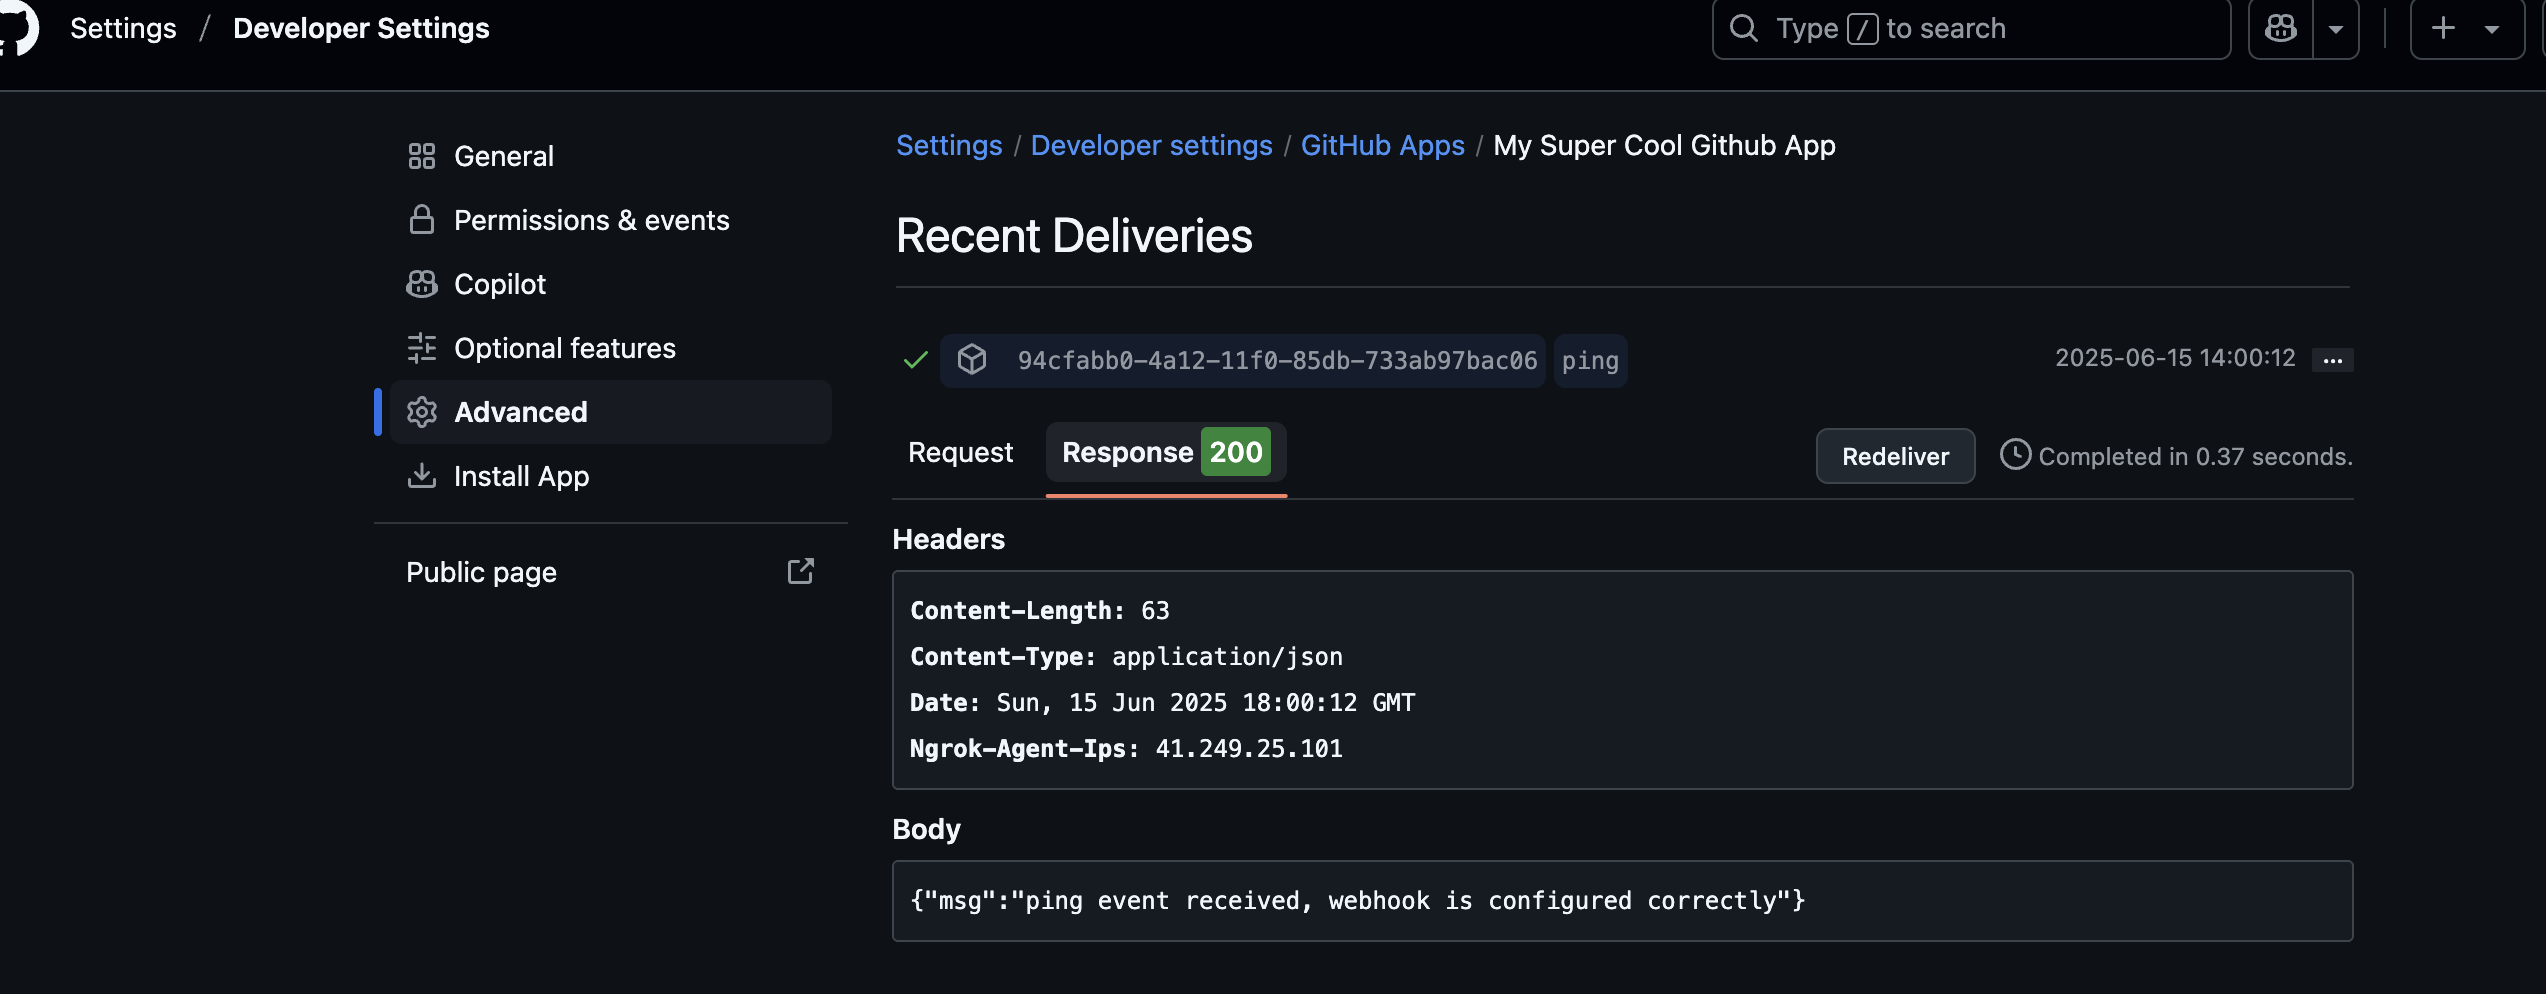
-
-
Install the new GitHub App into one or more repositories:
-
Select Install App from the left sidebar.
You will be presented with a list of accounts (users or organizations) into which you may install the App. If you followed the instructions for creating the App as presented above, only the account owning the App should be listed here.
-
Click Install next to the account into which you wish to install the App.
An installation dialog will appear.
-
Under for these repositories, select:
-
All repositories if you wish for all repositories owned by the account to send events to the webhook receiver.
noteSelecting this option will result in the App also being installed in new repositories belonging to the account as they are created.
-
Only select repositories if you wish for only specific, existing repositories owned by the account to send events to the webhook receiver.
noteIf this option is selected, the installation process can be repeated in the future to install the App into additional repositories.
-
-
Click Install.
-
When these steps are complete, all repositories into which your GitHub App has been installed will send events to the webhook receiver.
For additional information on configuring webhooks for GitHub Apps, refer directly to the GitHub Docs.